How to Make a Quilt Journal That’s Perfect for You
Tired of the same old pre-printed quilt journals with set fields that don’t fully capture your unique projects?
In this post, I’ll show you how to create your own customized quilt journal using just a blank sketchbook, glue, a few writing and drawing tools, and bits and pieces from your quilting projects. The sketchbook is a blank canvas where you can design journal pages that are truly meaningful to you. You create your own fields for fabric details, inspiration photos, modifications you want to make, or anything else that’s important to your quilting process.

I’ll provide graphics, layout ideas, and prompts to help you design beautiful, personalized pages that you’ll look forward to filling. Turning to a blank sketchbook means your journal becomes a one-of-a-kind reflection of your quilting style and interests. No more feeling constrained by generic fields – now your journal can evolve right along with your quilting journey in a way that’s just for you.
Why the Blank Sketch Book is Best
When I first decided to capture my quilting life on paper, I was attracted to the pre-made quilt journals. Those are the ones where someone else did the hard thinking about what information should be collected onto the page, in what order, and how much space to allocate to each part of the project. How easy, right? In reality, nothing exactly matched the way my thoughts flowed when starting a project or how my quilt making reality evolved and I just couldn’t settle on a ready-made journal or project sheet.
What do I mean? Well, some templates left a big space for a photo … of a finished quilt project. It was there at the top of the dedicated quilt journal page. As a quilter, you may know that projects started don’t always follow a linear progression. Sometimes, quilters start another project before finishing the one before. Right? So, that big space for a photo would just sit there, empty.
I couldn’t get into a template that left the first half blank until the very end of the process. Making a quilt is art which, like writing a story, has a beginning, middle, and end. I like to write about my beginnings. Sometimes, they are the most exciting part when ideas are popping up all over. And that deserves as much space as you need. With the blank journal, you decide how many pages a project gets.

Then, there were the guilt inducing “Date Started” and “Date Finished” sections. That’s assuming a lot! Other quilt journal designers seemed to think quilt makers only used 3-4 fabrics in a quilt. That’s how much room a generous template allocated for adding samples of fabrics to your journal. I’m a scrap quilter and if I want to use six pages in my blank journal to save a bit of every fabric I use, I can.
The Design Inspiration for my Journaling Style
My generic journal design inspiration came from Susan Branch’s “Heart of the Home” style of cookbooks which, to me, are actually illustrated journals with recipes. (If you aren’t familiar with Susan’s cookbooks, you can see more at her website) I chose this style years ago, probably last century (you know, the 1990s). I loved Susan’s books with their cute little watercolor pictures, a font that looked like perfect artistic handwriting, recipes, quotes and thoughts from the author. I’m not good at illustrating more than arrows and outlines so I decided that the fabrics can add the color and pattern to make the pages pretty for my journal.

How to Make a Quilt Journal Like Mine
Note, this post contains affiliate links. Ordering through these links does not cost you anything extra but I earn a small commission. For more information, see my disclosure policy.
I use a 5.5″ x 8.5″ hard cover, spiral bound sketchbook because the spiral binding allows for “give” and literally enables my notebook to expand as I add more than just words to it. For text and graphics like lines, arrows, boxes, etc., I use black Pigma pens. If I want some colored text or graphics, I use fine tip colored markers. If I want to fill something in with color, I find that colored pencils work better than the colored markers. The colored markers tend to bleed through the paper if you color heavily with them.
My first journal attempt was the Susan Branch style of watercolor but, as I mentioned, I can’t draw very well so the illustration was rather ugly and definitely lopsided. It wasn’t “me.” After the illustration failure, I decided I preferred my taste in fabric over my ability to draw and the fabric added color and pattern very nicely.
My second journal entry was the quilt I was starting at the time, a “Trip Around the World,” that I taught regularly at my local quilt shop. My favorite part of the project was choosing the 24 fabrics needed to make the quilt. Once I had them all selected I liked to line them up on my cutting table in order and pet them for a bit before getting started on cutting and sewing. To preserve that image, I cut little snips off my fabrics and glued them into the book in the same order as for the quilt. Since I date each journal entry, there’s a record of my “date started” but it’s implied, not specified so no pressure.
A Quilt Journal is More than a Record of Your Quilts
At the time I started this kind of quilt journaling, I was a stay-at-home mom of three with a husband who traveled often. I didn’t get a lot of adult interaction. In addition to information about my quilt plans, I included my thoughts about life, budgeting, getting dinner on the table, etc. My first journals are personal documents that may never be viewed up close by another human being. Today, those entries give me a glimpse of how I’ve grown and how the tough times come and go and we find a way to keep going.
My kids grew up, I went to work to help put them through college and gave up a whole lot of my quilting time. Now, I get lots of adult interaction, spending most of my week in an office. To counter-balance the vast amount of human interaction during the week, I crave the solitary escape of playing with fabric and planning projects.
My Journal Today
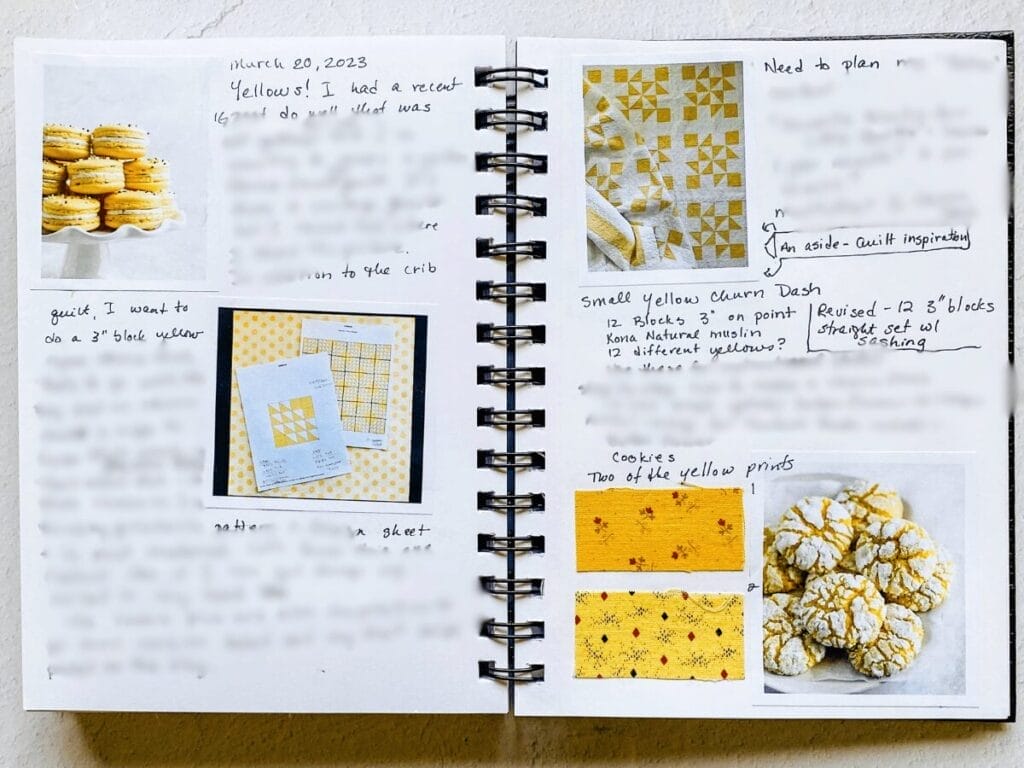
My journaling now is more about planning quilts and the thoughts that go into creating them. It is an indulgence to jot down ideas, sketch blocks, list cutting dimensions and even glue in pictures of the finished quilt. Since I date each entry I even have some “date finished” accomplishments. The narrative parts of my entries are less about pondering life and more directly about quilting.

This process is excellent for giving me a sense of control, even if it’s just bragging about making a short row of nearly perfect stitches. The gaps between entries, sometimes up to a year, illustrate that perhaps I’m not allowing myself enough time for what I love to do.
My point, if you’ve been waiting for me to get to one, is that quilting is a very personal hobby and is about much more than buying fabric and a pattern and stitching it into a three-layer sandwich. Creativity comes from within us and, by definition, is a manifestation of ourselves.
Documenting your journey is a worthwhile activity and may even teach you something about yourself. My experience has taught me that process is personal and no one can really create a perfect template for something so individualized as a journal about one’s art. If you start putting your ideas, thoughts, methods, wins, losses, down on paper you’ll eventually create something that matters, even if it only matters to you.
How to Start Your Own Quilt Journal

Supplies
You only need to gather a few items to be ready to make a beautiful journal that is a one-of-a-kind reflection of your quilting style and interests. Below is a list of the specific brands I’ve been using for 10+ years.
- Sketchbook, U.S. Art Supply 5.5″ x 8″ Premium Hardbound Sketch Book, Pack of 2, 80 Sheets Each
- Elmer’s glue stick, disappearing purple
- Sakura Pigma Micron fine liner pens – archival ink – assorted sizes
- Kalour Premium Colored Pencils, set of 50
- iBayam Journal/Planner colored fine point markers
Sketchbook
The 5.5″ x 8″ book is the perfect size to carry with you if you like to jot ideas down when they come to you or take to the quilt store when choosing your next fabrics. The books with 80 pages are enough to document a lot of quilts and the rings are large enough to leave some space for your book to expand as you add fabrics and bits of paper. The hard covers make the book very sturdy and the 70lb paper pages hold up well to ink and glue.
Glue Sticks
I use the Elmer glue sticks that have a purple tint so I can see where I put the glue on a white page. The purple disappears when dry and as you can see, some of my journals are 20+ years old, so it lasts well. Buying in a multipack is most economical and if you put the extras in the freezer they last longer.
Pigma Micron Pens
I love Pigma Micron pens because they don’t bleed through the page which enables you to write on both sides of the page. I use different thickness of lines for writing, drawing, making boxes, etc. They are great for a variety of other purposes in quilting so I like to buy the set with several sizes (6 pens range from 005 to 08). They are permanent and the ink is archival so it won’t damage your journal. I even use the very fine point Pigma pen when drawing a line on fabric when I’m making half square triangles using the two at a time method.
Colored Pencils
The Kalour brand of pencils have a soft core and cover the page well. They are great for layering color. If you can’t find that particular brand, just look for any high quality colored pencil.
Fine Point Journal Markers in a variety of colors
I use these markers to write in the quilt journal when I feel the urge for a change from black and I also use them in my planners and other notebooks.

Wow, I just got lost in reading all these comments, every single one. I’m reflecting on all the projects I’ve made for grandchildren over the years and although I took photos of most of them, now I’m trying to remember where on earth I recorded the photos, where are the notebooks I kept. we’ve moved many times and I didn’t keep them in one place (lesson learned). Today I have a lovely sewing room and in reading these comments inspires me to keep on recording and look for the some of those photos of projects I made that just sit idle on my iPhone and copy them and make a journal. After all, they do tell a story. . I often wonder if the grandchildren kept those projects; the dresses and pillow covers. I loved making those for them but from their perspective, they move on quickly and perhaps those projects landed in the “outgrown” pile and hand me downs to a Goodwill store..keeping this kind of journal in my sewing room library shelves is something they will find someday when I’m on the other side and they will remember the item and know where it came from. Thank you for sharing all these talents.
I don’t quilt, but this is an awesome idea and would work for many different hobbies!
It is interesting to hear how your quilt journaling has evolved over the years. You are right about it being such a personal experience! My own process has changed from a quilting-specific paperback book that I loved to a hardback spiral book that I did NOT love. Fast forward to the computer age and I am finding my blog to be the best quilt journal yet! My hand writing is TERRIBLE and a pen isn’t necessary. Plus, it’s much easier to add photos!
I too do not find the prepared quilt journals appropriate for me. I use spiral bound notebooks, use the lines to help guide my drawing of the block intended, even draw more to guestimate how many sashing’s etc… am not very mathematical so struggle with figuring yardage. Often when doing that it is way ahead of when I begin cutting and sewing. Sometimes I record the progress there, sometimes not.. I have another notebook that I write what I’m putting on the quilt label, before I actually write the quilt label, so I can see what I want to say.. This is my record of what quilts I finished when as well, since that info goes on the label. That way if also often know who got what!
I just love hearing all your thought processes. Mine are similar to yours and the preprinted quilting diaries. Nice, but just don’t flow with the way my quilting thoughts process. ✂️🧵💗 Thanks for taking the time to share. I think I’ll upgrade my notebooks to heavier paper than the three-ring-writing-paper kind.
Merry Christmas!
What a great post! I have been recording my daily quilt activities for about 30 years. I love how intricate and fun your journaling is. You have inspired me to add a bit of flare to my humdrum entries. Thanks!
I so enjoyed this post, lovely to read as well as look at the photos. I’m amazed how well the pictures of your quilts in the journal pages are so clear as small as they must be. Can you share your process on this please?
Thanks for your comment. The quilt photos I printed were taken with my iphone 7 and I used the “high” resolution image for printing. I’ve been through several color printers but this latest one is my favorite. It is a HP Laserjet. I like it because the colors are closest to the actual image and it has a really nice finish – with other printers the paper seemed to absorb the ink and it was kind of flat looking.
I copy and paste the image on a page in a word document so I can easily resize it to a small image that I cut out and paste in my book. I’m really liking adding the pictures that way.
If only we all could journal like Susan Branch! I think it’s great that you’ve found a format that works for you. I’ve also tried various ways to document my quilting journey, but it always kind of fizzles out–I just can’t seem to make myself stick with it!
I do wish I had 1/10th of her talent! My journals fizzle and revive periodically. There are literally year-long gaps. But, at least I can keep them around and go back to it when I’m in the mood. I’ve been much better at doing it regularly since I switched to nearly all little quilts. I’m sure it’s because they get finished soon after starting. 😉
Taryn
Do you leave blank pages between projects when they are in process? Or do you journal chronologically so that some project documentation entries are separated because other projects are begun before finishing the earlier project?
That is a really good question! The answer is, it depends. Since I now make mostly small quilts, I finish them much more quickly and all the pages do wind up being together. I either work on it from start to finish or know enough to judge if I need one or two more pages.
If I am doing a large quilt and know there are certain fabrics I want to use (and I have them!) I’ll put samples of them all together. I’m attaching a picture of that from a quilt I started more than 15 years ago. It’s not done. That really helped me to pick up the project and work on it over the years.
Others are chronological and will refer back to the date I first posted about the project and then I show progress. Nothing is hard and fast but I’ll definitely be more conscious about how I am doing things because of your great question.
I hope you have a good weekend!
Taryn
Thanks for your reply, Taryn. I have been keeping a large moleskine 1 day per page for years for an everything journal but have been wanting to make a journal dedicated to my decades-long quilt journey. I recently bought a notebook similar to the one you recommended & am looking forward to documenting my quilts for my daughters & anyone else interested. Luckily I have photos of most of them.
Fascinating! The premade quilt journals have never worked for me, either. I used to just use a tablet of grid paper and colored pencils, sketching my ideas, coloring it like the fabrics I was using, figuring dimensions and writing the cutting instructions out to the side–and sometimes remembering to add info on start and finish. Now I rarely make the time to journal what I am doing. But I love what I see here. I am very impressed!
I enjoyed reading this blog post. And I really like how you add anecdotal information in your quilt journal. I’m a retired registered nurse following a 53 year career in my field. I made my first quilt when our oldest son was around 10 years. Made a few scattered quilts, nursing is an exhausting job with four young boys to raise. Fortunately I was able to work only 4 days a week, usually the second and/ or third shift as my husband was/ is a carpenter. I was able to finally call myself a quilter when the boys hit the junior and high school grades. Good documentation rules a nurses’ life so it was natural for me to carry it over to quilting. Well, with trying to juggle 4 boys, life, and quilting I ended up with some Unfinished Projects! Since retiring, I found that I’m so much happier working on one quilt project from start to finish.
I use a spiral 8 x 10 lined notebook with a leatherette cover. Feels so nice to the hand. I did try a sketch book but it drove me crazy that my lines were crooked. I tried the popular quilt journals with all the bells and whistles. Must admit they are lovely and look so nice all decorated. But I quickly resented the time tit took me to document this way. LOL, nurses are always rushing!!!.
In the front, I wrote a list of all of my unfinished quilts and projects. I have 24 entries but it includes a pin catcher and two pillowcases. I entered all information about each and bagged each project up. Most have all the pieces cut and ready. Two “projects” are leftover fabrics from a quilt. I had picked out a quilt pattern tp make with these fabrics as tremulously in love with the fabrics. I did put pattern and or the directions that I had written up for each of the projects in the respective baggie. They are stored in a jelly cabinet in my quilt room so easy to access and “ready to go”.
Now for your article…… I sure wish that I had taken a picture of each project and added it to my journal! I love the look of your journal with the mix of diagrams, text, and photos. I use the larger left hand column to put the date and sometimes the weather. I also add the name of the quilt in a colored ink to the left hand for easy reference. At rare times I’m working on two at the same time but this is limited to machine work mixed with hand sewing a quilt binding, or printing a quilt label and hand sewing it on, and even the final documentation: ie, gift, etc. and the final photo. I love color coding my documentation, but limit it to the name of the quilt. I too use only my favorite brand of pen for this task.
My book has dividers that can be moved to where I want them. They also have pockets. That is where I have been putting my hand done drawings and all the cutting information etc. I usually tend to make up my own quilts. But, I think I like your idea of pasting this information along with the other information about the quilt. For the quilts that I impose a deadline, I most always jot down the time segments where I work on the quilt each day. Like you, I also add comments usually ones that affect the quilt. Like recently I tore an abductor muscle in my upper leg. Put quilting on a dead halt and quilting was a hit and miss the following 2 months depending upon my leg.
Sorry as I didn’t mean to write so much but really enjoyed your post. And I finished a quilt last night (Yes, that means the binding too) and started another one today. This time tho, I pulled one from my list of Unfinished. Turns out that it will be just Perfect for a Christmas gift! Plan to come back and reread this post a few extra times. I do this fairly frequently.
I really enjoyed reading about your system and appreciate your comment.
A 53 year career as a nurse is phenomenal. My daughter is just in her second year as a L&D nurse. She is the most organized person I know and I get a lot of tips and tricks on it from her.
I also plan on rereading your comment because you’ve given me some good ideas. It’s always nice to tweak things. Keeps it fresh!
Best wishes,,
Taryn
All such great ideas!